Building an ObservatoryWhere to put a Telescope
Most amateur astronomers store their equipment in their house and move everything into the back yard when it’s going to be clear. Setting up a small refractor on a small equatorial mount is not a difficult task. However, once the move is made to larger telescopes, cameras, and computer control, the assembly and disassembly time can be longer than the observing time. There is also the problem of storage. I have been informed the dining room is not optimal. Check your local building codes and bylaws.
Electricity is needed to run the telescope, camera, and computer. A heavy-duty extension cord was connected from the house to the observatory. The cord was run along the fence, out of the way of people and garden equipment. If the electrical supply is wired permanently, an inspection will be required. Another option is solar power, which removes the outdoor wiring problems. Home insurance should be checked to see what’s covered and what’s not. A good plan will cover everything in the observatory, and the observatory itself. A door with a good lock is required, and bars on the windows. The shutter should also be locked when not in use. Make drawings of what you are going to build. Determine how everything will fit together. It takes some time, but you will discover hownot to build things along the way. Make a bill-of-materials. Now you know how much it will cost, and how many trips to the hardware store it will take to pick everything up... before you start picking up all the stuff you forgot.
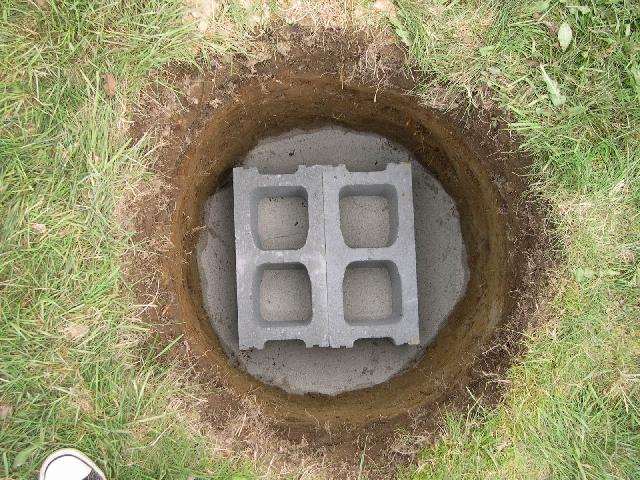
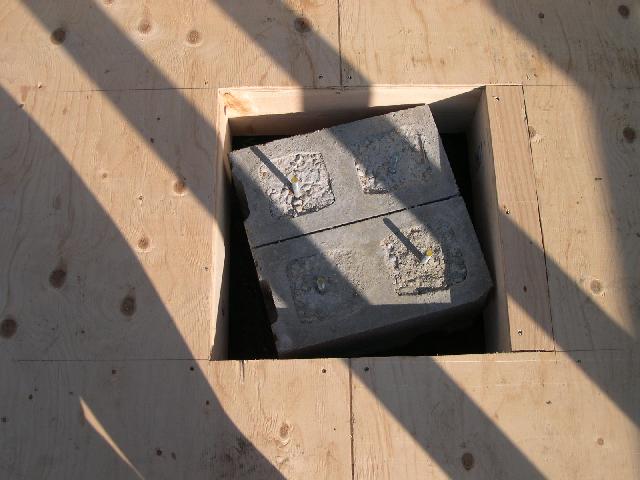
Remember the concrete for the footings and for the pier and how much concrete weighs... this is more of an issue for cars than trucks. I used about 600 kg (1200 lbs) of concrete in my pier. There’s no way I can carry that in one trip in my Miata ! Think about the wiring. 12 V or 120 V ? Permanently wired or temporary ? Will you be using circuit breakers ? How about an external outlet for an extra telescope or the lawn mower ? Do you need power in the dome for a radio (or satellite dish, or beer fridge) ? There’s also network cables for backing up the data, and a phone line so you know when to go inside and do the dishes. The telescope mount must be bolted to something sturdy - typically a concrete pier. Concrete blocks were chosen for the framework of the pier because it reduced the amount of liquid concrete that had to be mixed by hand.
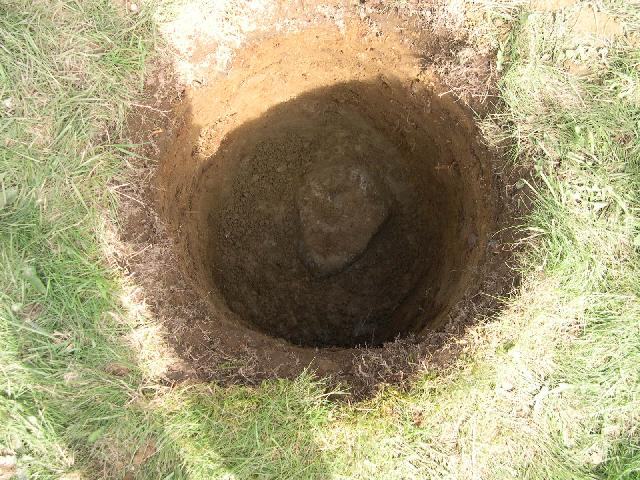
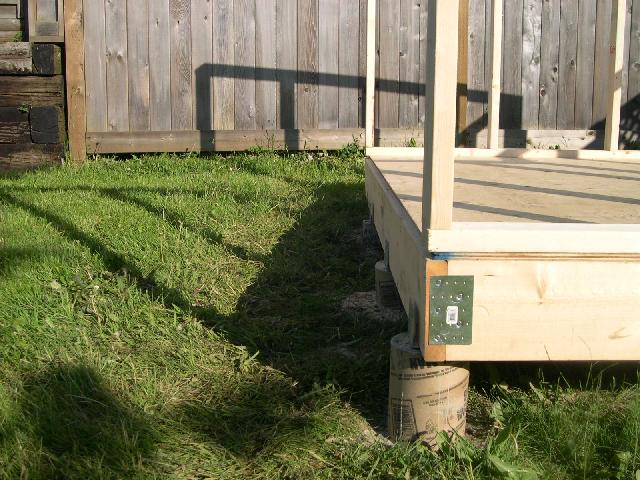
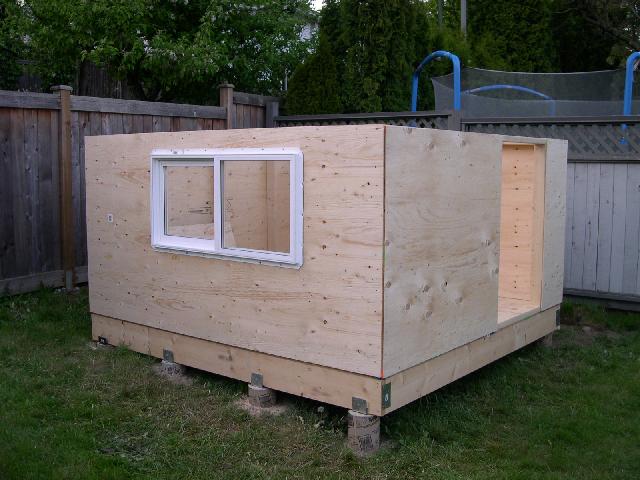
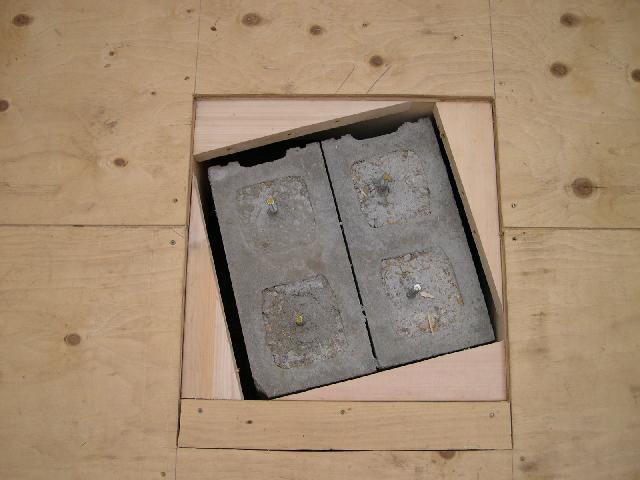
It took about 2 hours to dig a hole 24" across and 30" deep. A medium sized rock in the bottom of the hole can be seen. It took an hour to remove the rock. After that, a larger rock was discovered... so the final depth of the hole was about 36”. Small rocks were added get the bottom of the hole near flat. Sand was added to level the first row of blocks. Two mistakes were made. First, the blocks were not aligned with the yard or with the celestial pole. This problem will be solved later. Second, mortar was not used between the vertical faces of the blocks. This should not be a problem because each of the 4 vertical holes will be filled with concrete and re-bar. Concrete was poured into the hollows in the blocks. Re-bar and threaded rod were installed while the concrete was still wet. A piece of 3/4" MDF was used to locate the threaded rod while the concrete dried. The ends of the threaded rod were bent so they wouldn’t pull out of the concrete. 8 holes were dug, about 8” diameter for piers to support the building. Each hole is about 24” deep, and the concrete piers are about 30” tall. Once they were set, I started on the floor. Doubled-up 2x10s were laid along the piers. Four more 2x10s were hung across the two beams. Two sheets of 5/8 plywood were used for the floor.
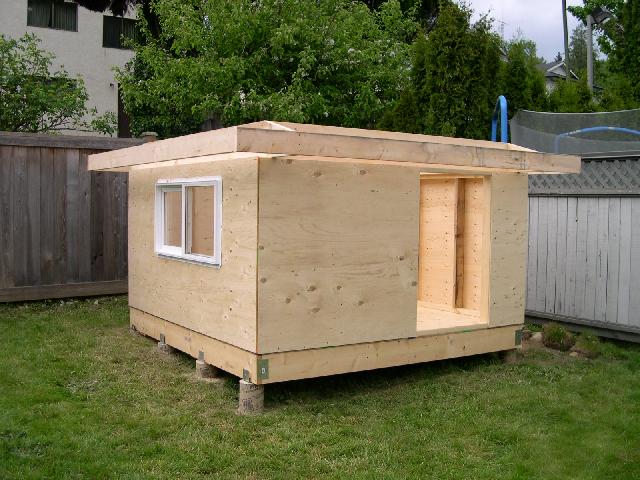
The walls are made from 2x4s. The walls are 4’ high with studs on 24” centres. Figure 3 shows the first two walls on the floor. I made one mistake when installing the floor. A number of people suggested the standard "measure twice, cut once." That only works if you measure the right piece. You can see how far off the angle of the pier is. There is about 1/4" from each corner of the pier to the frame of the building. The walls were made from 1/4” plywood. A window was added for looks and for some extra air-flow in the summer to cool things off. The roof transition was built according to the plans on the Exploradome Website. First the 2x10s and then the 2x6s. This kind of construction is overkill because the dome weighs only 60 kg. Looking back, I would have reduced this to 2x6s and 2x4s respectively to reduce cost and weight.
The 15 degree cuts at the corners of the roof were used (suggested by she who is smarter than me) to fill in the corners around the pier. Remarkably, they fit with no modification at all. |
|
|
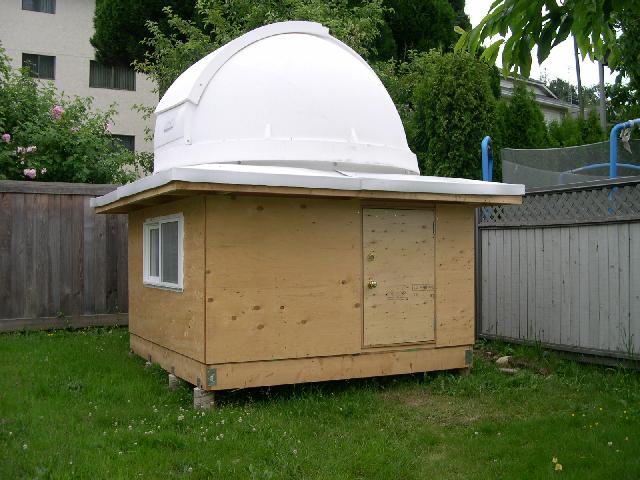
The Roof
The roof transition was leveled with shims before it was attached to the top of the walls. The dome ring was also leveled before using lag screws to hold it to the structure. A long strap was used to tighten the roof panels to the dome ring. Machine screws were used to bolt the roof panels to the dome ring. Wood screws with rubber gaskets were used to hold the panels to the roof. The panels are larger than the roof structure which is odd because the roof transition matches the drawings from Exploradome. The roof transition pieces had to be cut with a circular saw to make them fit. There were nice little overlap areas in the original pieces, but because everything was the wrong size, these pieces were removed to make things fit. Now the transitions don’t overlap nicely. A door was constructed from left-over 2x10s and 1/4” plywood. This was less expensive than purchasing a new exterior door and cutting it in half. The support wheels and centering wheels were mounted on the dome ring using the supplied machine screws. Exploradome supplied instructions for building a plywood dome ring and installing the wheels on the plywood ring. Instructions for the plastic dome ring did not exist at this time, so measurements from the available wood-ring instructions were transferred to the plastic ring.
The wheel channels were mounted to the dome according to the Exploradome instructions. This was frustrating because the channels did not fit as pictured in the instructions. Once the dome was lifted into place, it was discovered that the wheels did not line up according to the instructions or the drawings. Also, the wheel channels interfered with the support wheels. Again, this is disappointing because the dome itself does not match the dimensions that were stated in the instructions. But now the dome is on and I just want to get it finished. |
|
|
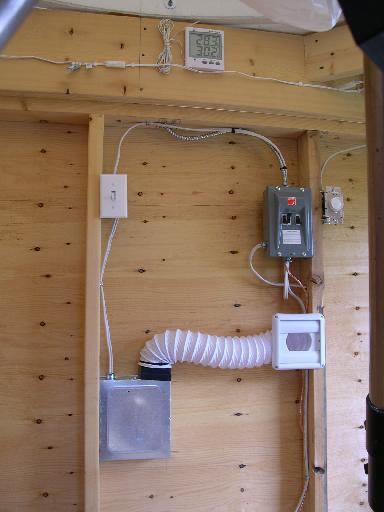
Electrical
The electrical work was completed in a couple of days. I have power from the house via an extension cord. Power goes into a small breaker panel inside the dome. One circuit for lights, one circuit for outlets, and one circuit for the ventilation fan. A ground post was installed outside the dome. The wiring is compliant with the BC electrical code. At this point, the scope on its tripod was moved into the dome. The floor moves a bit when you walk around, whatever you're looking at moves too. But the scope is in the dome! |
|
|
Exterior
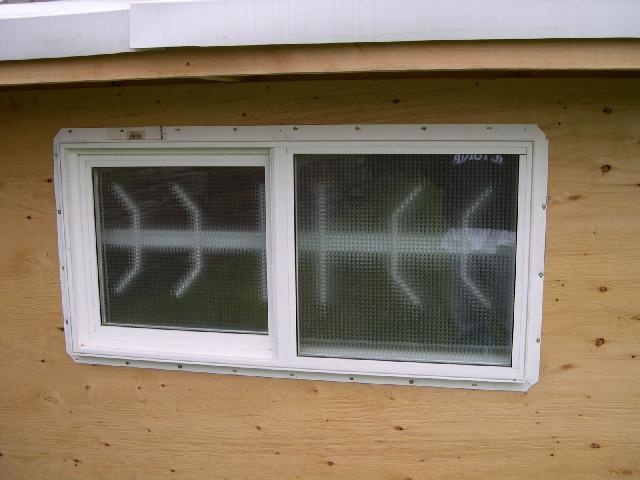
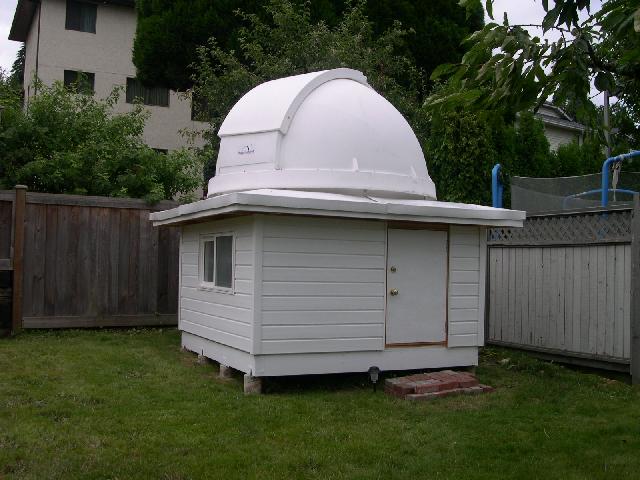
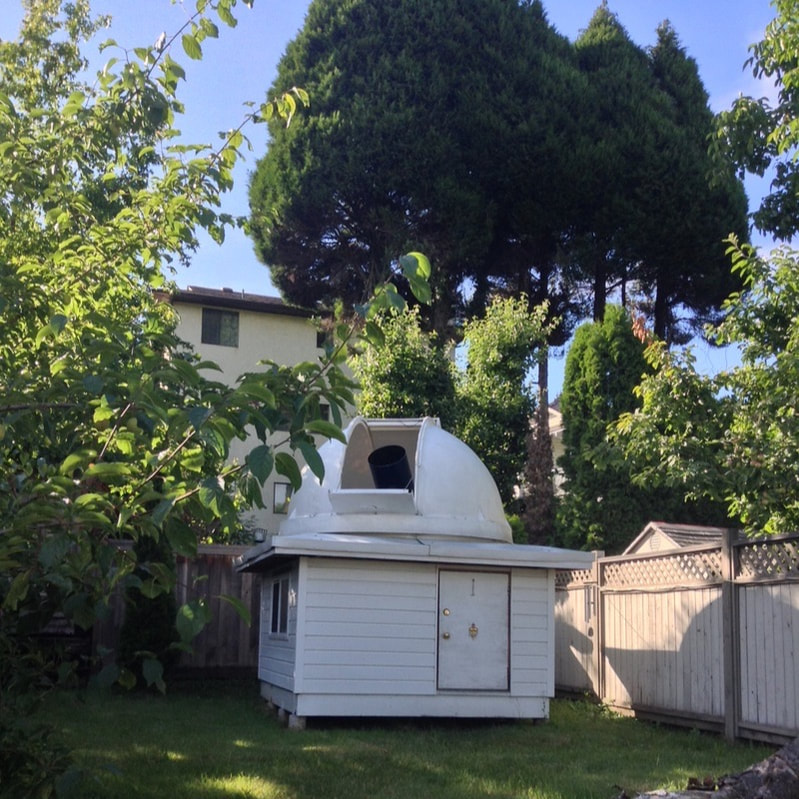
Vinyl siding was installed in about 8 hours. The remaining exposed wood will be painted. Frosted film was installed on the inside of the window. A locking door handle and dead-bolt were installed in the door. Bricks were placed outside the door to reduce the amount of mud getting tracked into the observatory. It’s the middle of July and it reached 24 C outside and 24.5 C inside the dome. The ventilation fan may not be needed. If the shutter is opened all the way, it falls of the guide tracks. The manufacturer tells me that this should not happen. Obviously. Once the shutter falls off the guide tracks, it is very difficult to close the shutter again because it needs to be lifted back onto the tracks. This is almost impossible from the ground because the roof transition prevents me from getting close enough to the dome without a ladder. For now, I stick a piece of foam on top of the dome skirt to support the shutter when it opens. The shutter can not be closed from inside the dome due to friction between the shutter and the tracks. From outside the dome, it is easy to see that the curve of the shutter does not follow the curve of the tracks. This is more of a prototype than a product. But things are progressing. |
|
|
Interior
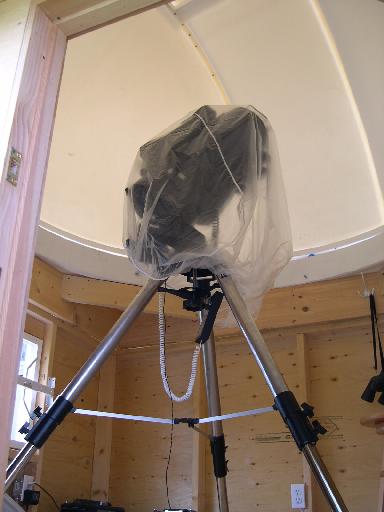
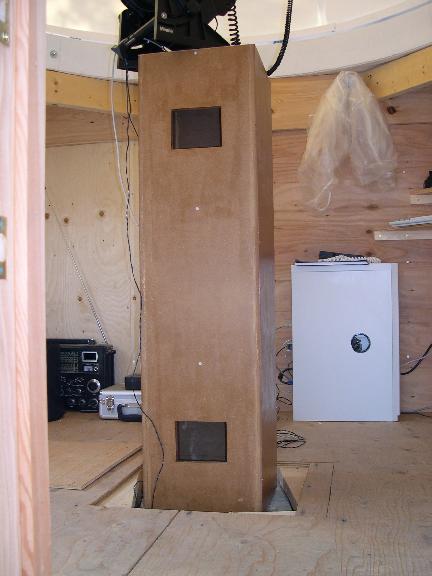
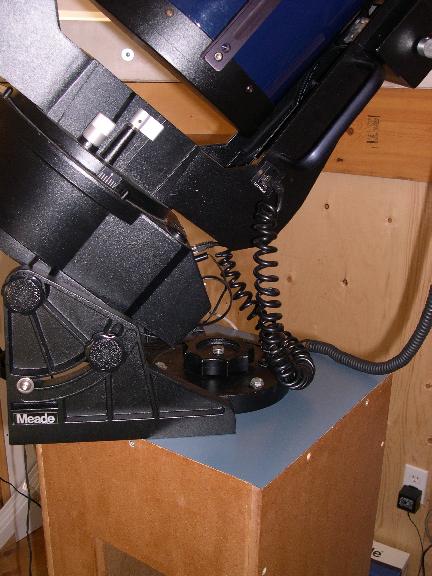
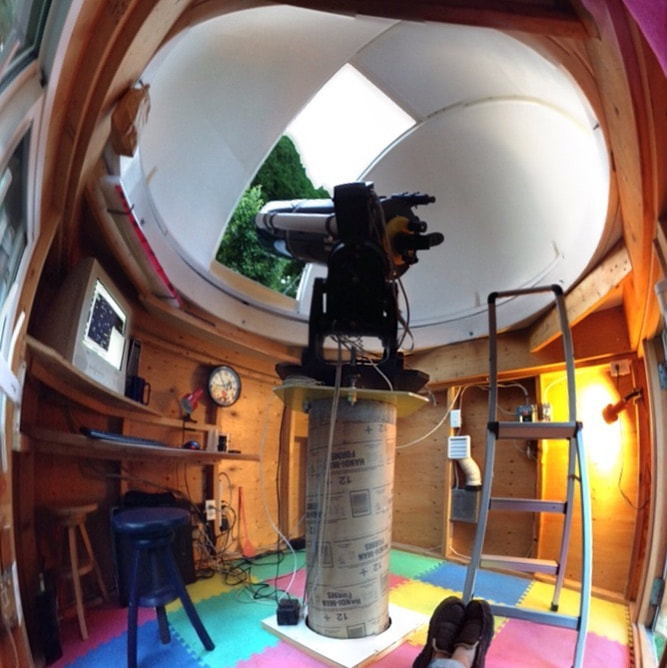
I built a temporary pier out of MDF. Rabbeted all the corners, couple of braces inside, two coats of shellac. Bolted to the concrete pier. MUCH more sturdy than I was expecting. If I nudge the pier, it stops moving in under 5 seconds. If I rap the side of the pier, it rings at about 600 Hz. It’s 3/4" MDF, 12" square, 46" high, and weighs about 35 kg... definitely more than the telescope. There’s a couple of holes so I can get inside with a wrench and tighten everything. Now I just need some clear sky to align the telescope mount.. There’s a piece of arborite on top so the wedge turns smoothly. I used to have a piece of plywood covering the hole in the floor. Now I just need to cut a hole in that piece the size of the pier so I don’t lose any eyepieces to the spiders. Wall panels were added to keep people from bumping into the nails that hold on the vinyl siding. Under-cabinet lights were installed with a dimmer in three of the corners. A network cable was run from the house to the observatory for easy download of data and remote monitoring. Foam tiles for children’s play areas have been used to cover the floor. The dome cost approximately $2400 after shipping and taxes. The structure cost about $1000, including the concrete for the piers and the electrical system. The grand total is approaching $4000 after all the details. In this price range, the only competition is a roll-off roof, the Skyshed Pod, and the RoboDome. Each of these options has their own advantages and disadvantages. Initially, the low cost of the ExploraDome, $950 was a selling point. However, the exorbitant shipping cost, and the cost of the structure removed that advantage, and there is no automation system in place. The Robodome is $4600 and includes automation, and arrives assembled, ready to go. The main disadvantage of the Robodome is that you can not sit in the dome with the telescope - it's only 4 feet across. The Skyshed Pod costs approximately $3500 after shipping and taxes, with no method of automation and no view of zenith. A roll-off roof observatory will cost approximately $2000, but provides no protection from the sky or local light pollution. |
|
The Future
After using the observatory for a while, and using the network connection to check up on things from inside the house, the next obvious step is dome rotation. This is a non-trivial task. It is a small task to buy a motor and some relays. The motor must somehow move the dome. This is a matter of having enough friction at the motive interface, and very little friction everywhere else. The most common issue the author has seen in other people’s domes, is that the domes are not round, and the dome support and centering wheels are misplaced or misaligned. The dome ring, dome, and wheels form a roller bearing. The ED dome is not particularly round and this is the primary cause of friction when trying to rotate the dome. This problem will have to be solved before reliable motorised operation can be achieved.
Fixes
The wheel channels were removed, one by one, and run through a table saw to trim the height down. The outside corner was also routered in order to make the channel fit more closely with the dome. When the channels were re-installed, they fit too well and the machine screws that shipped with the dome had to be replaced because they were now the wrong length. The outer edge of the channels used to interfere with the centering wheels - now the inside edge of the channels interferes with the support wheels.
I was sent a package by the manufacturer which contained about 1 foot of shutter track and some rope with handles. The shutter track should fix the issue with opening and closing the shutter all the way.
In the End
In my opinion, this observatory package is not yet a product. It may be an advanced prototype, but several modifications of the parts are required in order to make things fit together and work. These modifications are not completely documented at the ED website, and the manufacturer does not appear to be interested in assisting - leaving much of the troubleshooting to the Yahoo group with no apparent input from the manufacturer. With accurate instructions and drawings, and with customer support from the manufacturer, this process could have been painless. Next time, I will build the dome from scratch.
However, the telescope is installed in a backyard observatory, with power and a network connection. I used the LX200 about 6 times in the first year that I had it. I used it six times in the first month after I installed it in the observatory. This is the reason to have an observatoy.
The dome itself does not leak, but the roof sections do dribble a bit. The structure appears to be secure. Motorised rotation is currently not an option because the dome binds on the wheel mounts. I am talking with a friend who works at a major observatory manufacturer for design assistance.
|
Epilogue
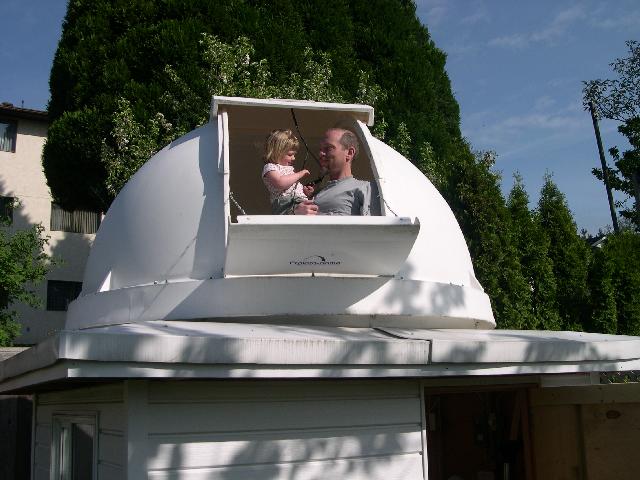
They day the dome was lifted onto the observatory, my 16 month old daughter wanted to see inside. While standing in the shutter opening and looking out, I accidentally bumped her head on the shutter. Once the crying stopped, she would not go near the observatory for another two months. Now, when I get home from work, I am greeted by my daughter who is looking for the keys to the dome so we can go look at the moon. |
|
|
Go big!
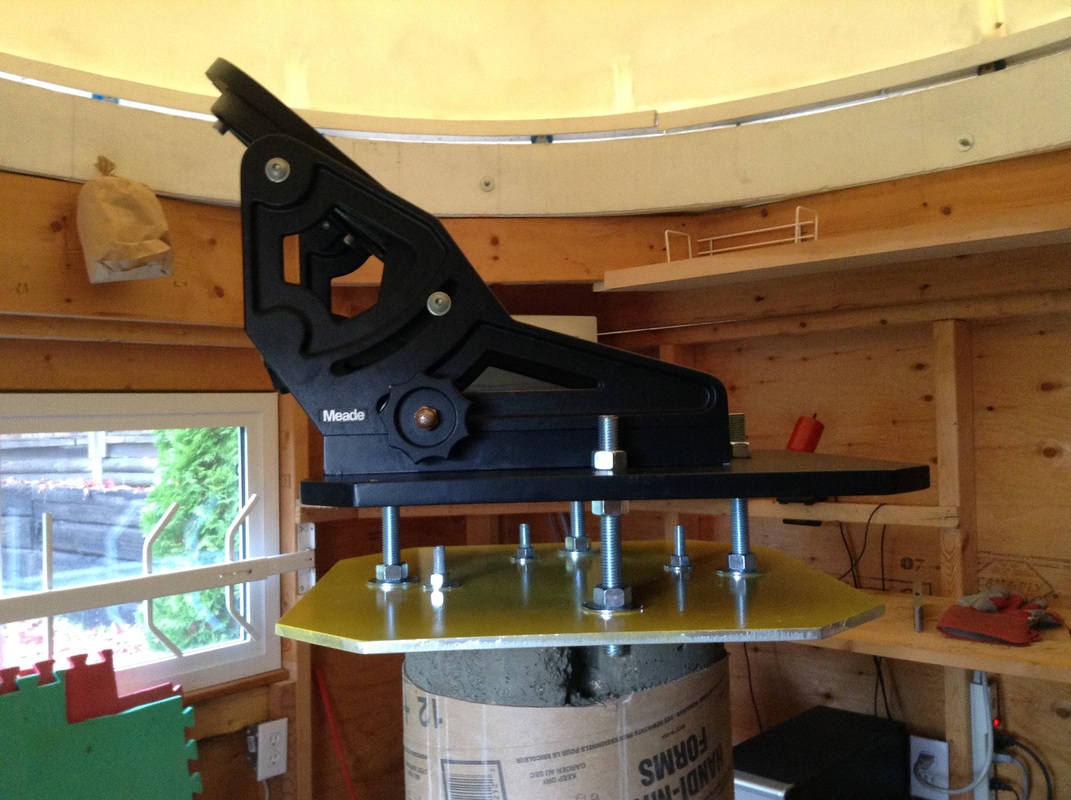
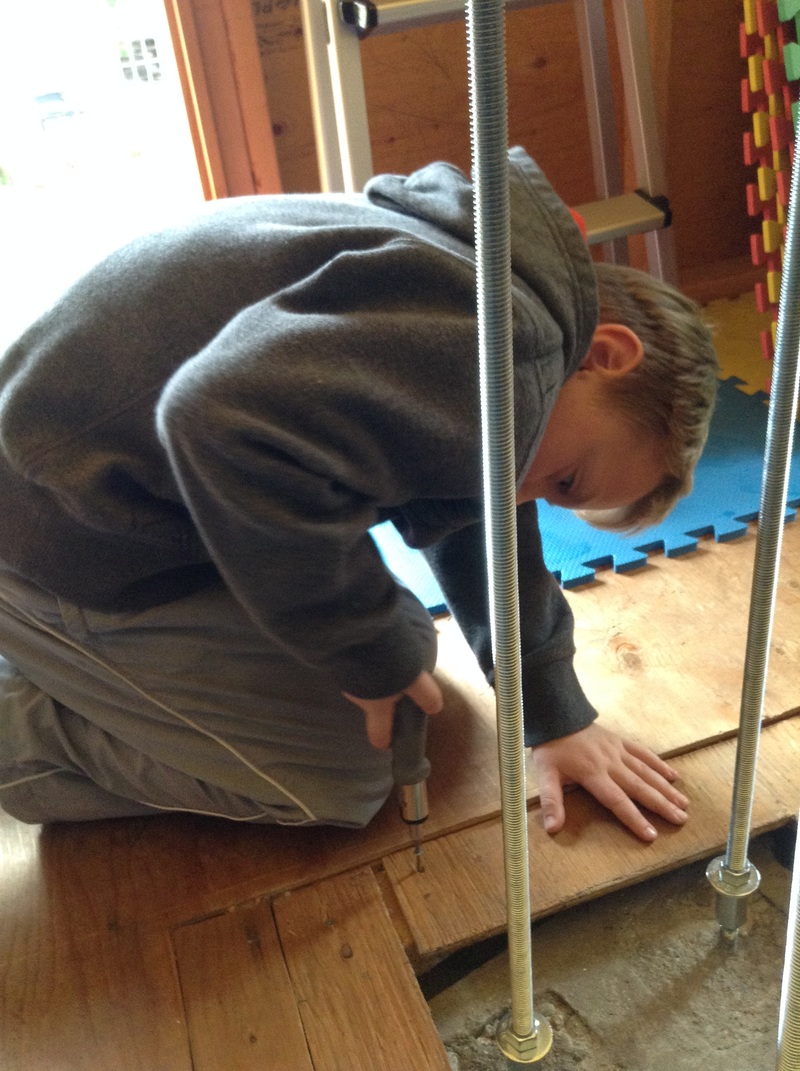
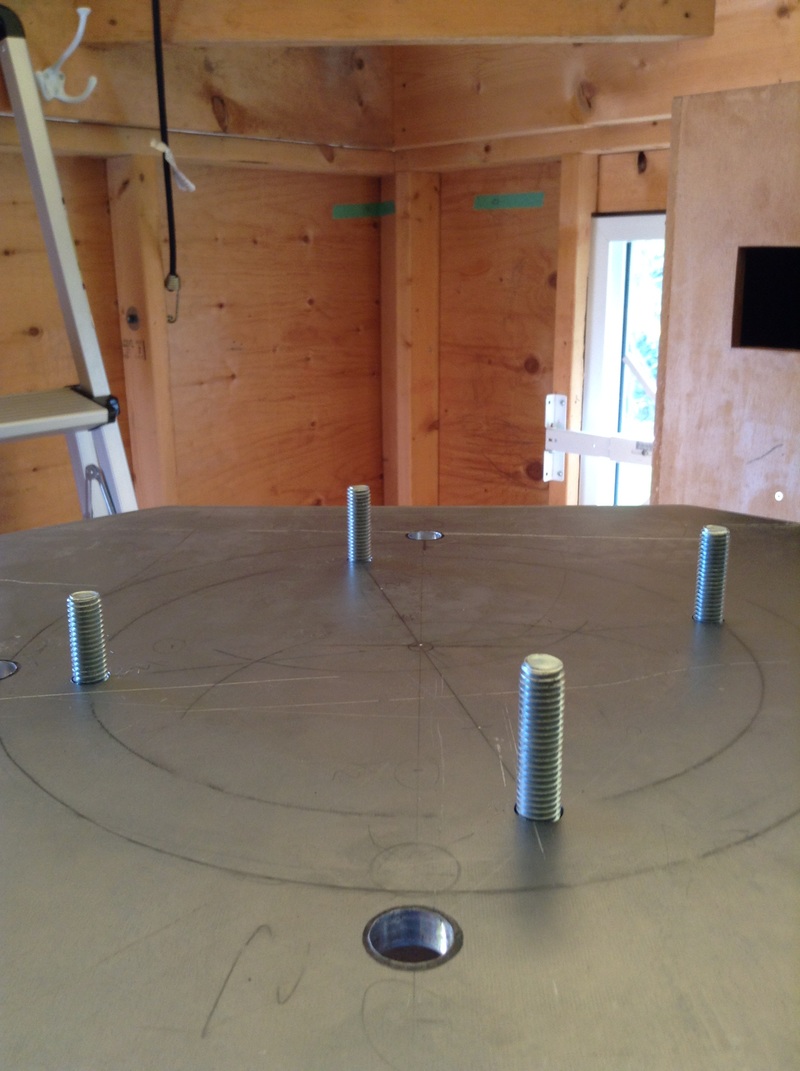
The 8" LX200 is fantastic. No complaints at all - it works first time, every time. But 8 years later, a bigger scope came along - a 14" LX200-GPS. The 8" scope, with everything on it weighs about 30kg. The 14" is more like 150 kg, and I wanted something better than the MDF pier. So my son and I built a concrete pillar. The blocks are 18" square, so we chose a 16" Sonotube and 5 bags of concrete mix. Threaded rod was attached to the original bolts in the base. These will be connected later to a top plate. The fellow I bought the scope from gave me the top plate from his pier. It fits the giant wedge to get the telescope polar aligned. South is roughly in the direction of the corner of the building. My son helped put all the nuts and bolts together and made sure the top plate was level. 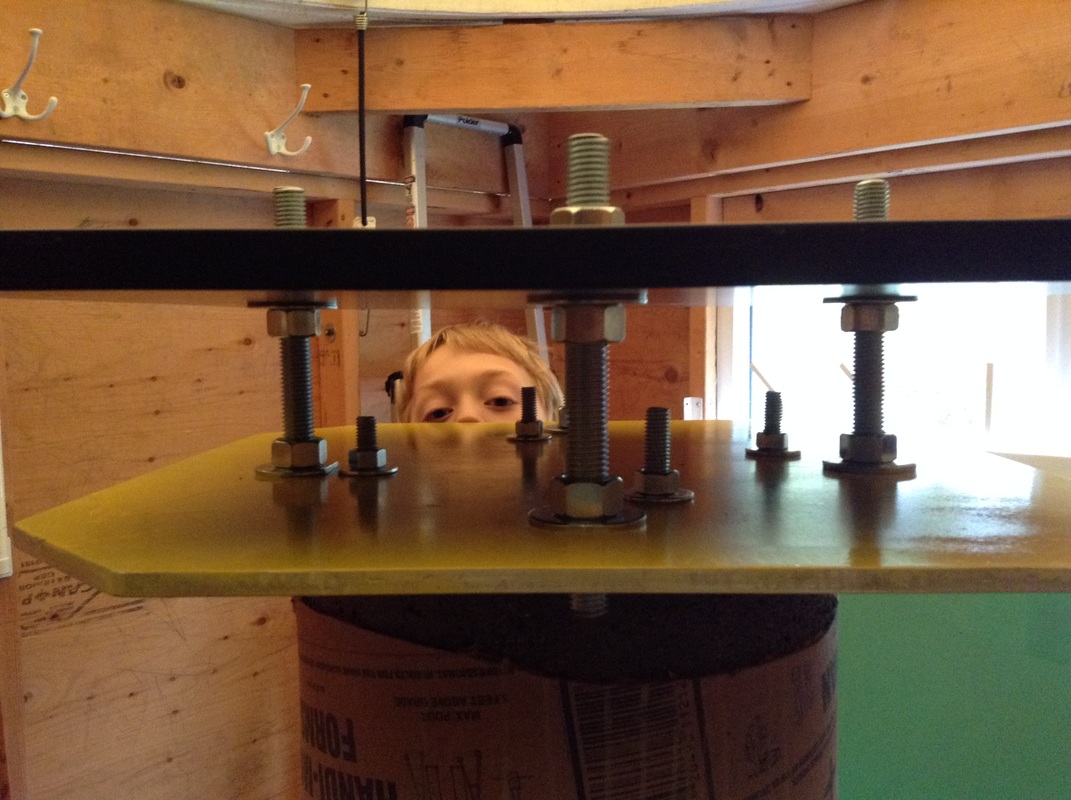
|
|
|
Almost there
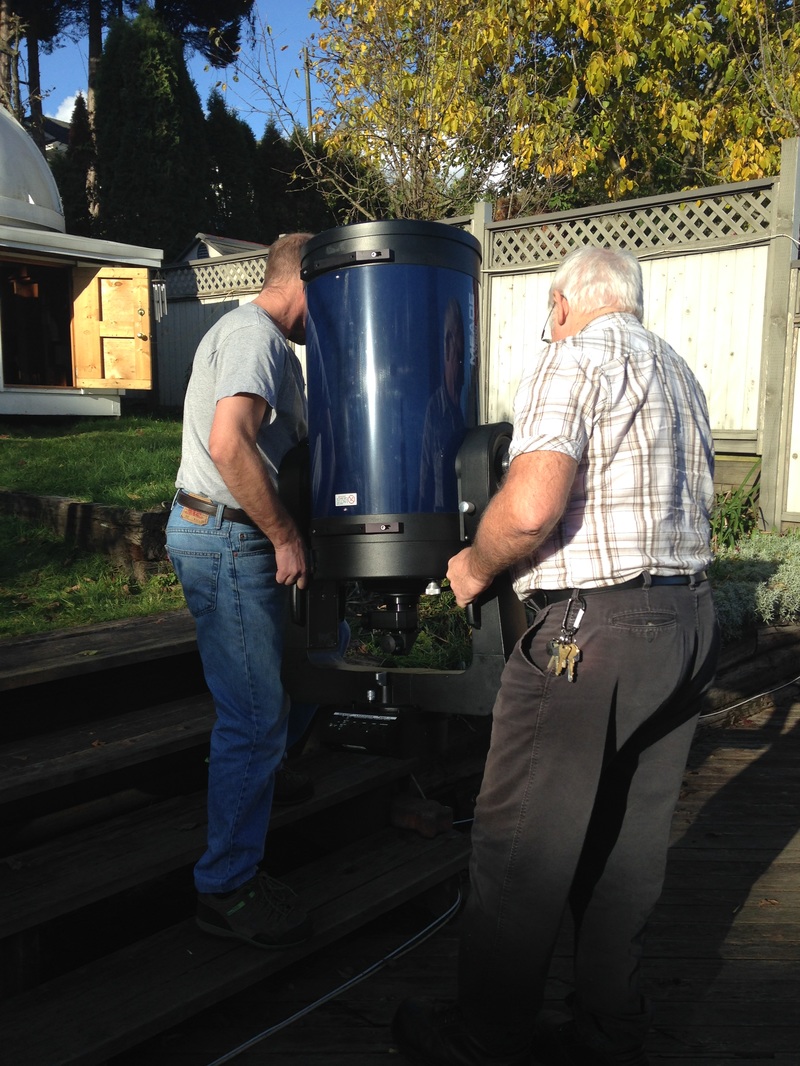
I had to call a friend to help lift the telescope into the dome. The tube plus the fork mount weigh about 65 kg. The tough part is getting it through the door and up onto the wedge while I do up the bolts. Did I mention it's huge? It filled the back of my car! I worried about every bump in the road on the way home. 
|
|
The End...
So now it's in the dome. The dew shield is on and I have a small refractor with a solar filter bolted onto the bottom of the main scope. The white siding and the white dome keep the inside temperature within a couple of degrees of the outside temperature. The dome protects you and the telescope from the cold. You're only exposed to the sky through the hole in the dome, not the entire sky. I don't need a dew heater, and neither does the telescope. It's a lot of fun to go out and open the dome and have a look at whatever is out there. I don't have to spend half an hour setting everything up, and then shutting down early so I can pack it all up again. Turn on the telescope, open the dome, everything is ready to go in about 2 minutes.
And my kids like to sleep out in the dome because it's more fun that a tent. I completely agree!
|
|
